- Introduction: Why ComfyUI is the Future of AI Image Generation
- ComfyUI vs. Automatic1111: A Quick Comparison for Newcomers
- Getting Started: Installation and First Launch
- Understanding the ComfyUI Interface: Your First Look
- Building Your First Basic Workflow: Text-to-Image
- Problem Solving: Why Are My "Nodes Are Empty ComfyUI"?
- Conclusion: You've Mastered the Basics, What's Next?
Introduction: Why ComfyUI is the Future of AI Image Generation
In the electrifying world of AI art, a new name is quietly revolutionizing how creators bring their visions to life: ComfyUI. While other platforms offer simple text boxes and sliders, ComfyUI presents you with a blank canvas and a set of building blocks. It might look intimidating at first, but this modular approach is precisely where its incredible power lies. It’s a tool that hands you not just the artist’s brush, but the entire workshop.
ComfyUI is a node-based graphical user interface (GUI) for Stable Diffusion, a powerful AI model that generates images from text. Instead of a rigid, linear process, you visually connect different components—or “nodes”—to build a generation “graph.” This method provides unparalleled flexibility, efficiency, and control over every single step of the image creation process. Its popularity is surging because it’s faster, uses less VRAM, and allows for the creation and sharing of incredibly complex and innovative processes that are simply impossible on other platforms. This is why understanding the basic comfyui workflow is the key to unlocking the next level of AI artistry.
This guide is for everyone. Whether you are a digital artist seeking more control, a developer looking to integrate AI into your projects, or a curious AI hobbyist eager to peek under the hood, you are in the right place. We will demystify the nodes, untangle the “noodles” (the connections), and guide you step-by-step. By the end of this article, you will not only have the confidence to navigate the ComfyUI interface but will have successfully built your first workflow from scratch and generated your first stunning AI image.
ComfyUI vs. Automatic1111: A Quick Comparison for Newcomers
If you’re coming from the world of AI image generation, you’ve almost certainly used or heard of Automatic1111 (A1111). For a long time, it was the de facto standard. Understanding how ComfyUI differs is crucial to appreciating its unique strengths.
-
Core Philosophy: The most significant difference is the workflow. A1111 uses a linear, top-to-bottom interface. You input your prompt, select your settings from various tabs and sliders, and hit “Generate.” It’s a single, pre-defined path. ComfyUI, in contrast, is a modular, non-linear system. You decide the path. You can split the process, run parts in parallel, chain multiple models together, and create a visual representation of the logic. This modularity makes a comfyui workflow inherently more adaptable.
-
Performance: ComfyUI is renowned for being faster and more resource-efficient. Because you only load and execute the nodes present in your graph, it doesn’t waste resources on features you aren’t using. It intelligently re-calculates only the parts of the workflow that have changed, saving immense time during iterative work. For users with less VRAM on their GPUs, ComfyUI is often the only way to run newer, more demanding models like SDXL.
-
Flexibility: This is ComfyUI’s grand slam. Want to blend three different LoRAs at varying strengths at different stages of the sampling process? Easy. Want to use one model for the initial structure and a different one for the fine details? You can build that. The ability to save an entire, complex workflow into a single image or JSON file and have someone else load it perfectly is a revolutionary feature that fosters a powerful community of innovation.
-
Learning Curve: Let’s be honest: A1111 is easier for a complete beginner to get their very first image from. Its interface is more familiar. ComfyUI’s blank canvas can be daunting. However, while A1111 is easier to start with, it has a lower ceiling for complexity. ComfyUI has a steeper initial learning curve, but once the core logic “clicks,” your potential for growth is virtually limitless. This guide is designed to get you over that initial hurdle.
Getting Started: Installation and First Launch
Before we can build, we need to set up our workshop. The installation process is straightforward, and the official ComfyUI documentation provides two excellent methods depending on your needs: a simple portable installation for Windows users and a manual installation for those on other operating systems or who want more control.
The Easy Way (Portable Install for Windows)
For most Windows users, especially beginners, the portable version is the highly recommended starting point. This method is the essence of how to easy use comfyui. It bundles Python, all necessary dependencies, and ComfyUI itself into a single, self-contained package.
As per the official ComfyUI portable installation guide, here are the steps:
-
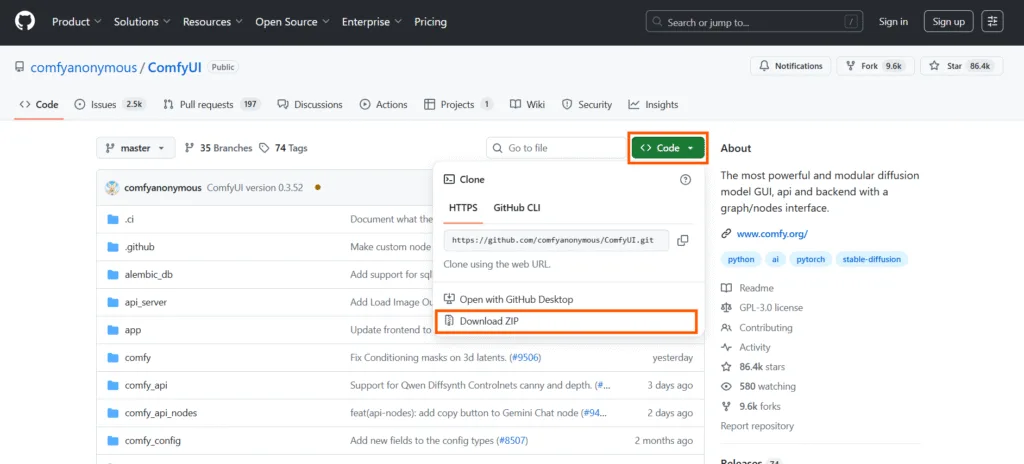
Download the Package: Navigate to the ComfyUI releases page on GitHub. Click on the green button labeled as ‘Code’, a dropdown menu will open, and you can download the zip file.
-
Extract the Archive: You will need a file archiver that can handle .7z files. 7-Zip is the recommended tool (it’s free). Do not use WinRAR, as it is known to cause issues with this specific package. Right-click the downloaded file and extract its contents to a location on your computer with plenty of free space.
-
Run the Setup: Once extracted, open the new ComfyUI_windows_portable directory. To start the program, simply double-click on either run_nvidia_gpu.bat (for NVIDIA graphics cards) or run_cpu.bat (if you do not have a supported GPU).
The first time you run this, a console window will appear and it will take a few minutes to set everything up. Once it’s done, ComfyUI will automatically open in your web browser, and you are ready to go.
The Next Crucial Step: Downloading Your First Model
After complete installation, your ComfyUI is an engine without any fuel. You need to download a “checkpoint” model, which contains the actual AI needed to generate images.
-
Go to a reputable model-sharing site like Hugging Face or Civitai.
-
For your first model, search for a standard, high-quality checkpoint like “Stable Diffusion XL Base 1.0”.
-
Download the model file. These are often several gigabytes in size and usually have a .safetensors extension.
-
Place this downloaded model file inside the correct directory in your ComfyUI folder: ComfyUI/models/checkpoints/.
Troubleshooting Common Installation Issues
Sometimes things don’t go perfectly. If you’re stuck, here are a few common culprits.
-
Addressing the “Unable to start ComfyUI” error: This is a frequent issue for new users. First, carefully read the messages in the console window. It will almost always tell you what the error is. Often, a specific dependency failed to install. Running pip install -r requirements.txt again from within the ComfyUI directory can often fix the issue. Also, ensure your GPU drivers are fully up-to-date.
-
Dependency Conflicts: (Manual Install) If you have many Python projects, you might have conflicting package versions. It is a strong best practice to create a dedicated Python virtual environment (venv) for ComfyUI. This isolates its dependencies and prevents conflicts with other software on your system.
-
Ensuring Your Models Are in the Correct Directory: ComfyUI is very strict about its folder structure. If you download a model and it doesn’t appear in a node’s dropdown menu, double-check that it is in the right place.
-
Checkpoints: ComfyUI/models/checkpoints/
-
LoRAs: ComfyUI/models/loras/
-
VAEs: ComfyUI/models/vae/
If you add a model while ComfyUI is running, you must click the “Refresh” button in the UI for it to appear.
-
Understanding the ComfyUI Interface: Your First Look
Once you successfully launch ComfyUI, your browser will open to a blank grey canvas with a default set of nodes. This is your workspace.
-
The Blank Canvas: This is where you will build your workflow. The general logic flows from left to right. You start with your inputs (models, prompts) on the left and end with your final output (the image) on the right. You can click and drag on the canvas to pan around and use your mouse wheel to zoom in and out.
-
The Menu: On the right side, you’ll see a menu with several key functions.
-
Queue Prompt: This is the “Generate” button. It executes your current workflow.
-
Save: Allows you to save your current node layout as a JSON file.
-
Load: Lets you load a JSON file to restore a previously saved workflow.
-
Clear: Wipes the canvas clean.
-
Load Default: Resets the canvas to the default starting workflow.
-
-
The Core Components:
-
Nodes: These are the rectangular boxes that each perform a specific function (e.g., load a model, encode text, sample an image).
-
Inputs and Outputs: These are the small, colored circles on the sides of the nodes. You connect an output from one node to a matching input on another.
-
Noodles: This is the community’s affectionate term for the connecting lines you draw between nodes. They visually represent the flow of data through your graph.
-
Essential ComfyUI Keyboard Shortcuts to Speed Up Your Workflow
Using keyboard shortcuts can dramatically improve your experience and make building workflows much faster. Here are a few of the most important comfyui keyboard shortcuts to learn from day one:
-
Adding Nodes: Instead of right-clicking, simply double-click anywhere on the canvas. A search menu will pop up, allowing you to instantly find and add any node by name. This is the fastest way to build.
-
Navigating the Canvas: Hold the spacebar and click-and-drag to pan around the canvas without having to find an empty spot.
-
Connecting and Disconnecting Nodes: You can drag a noodle from an output and drop it in an empty space to bring up the same search menu, filtered to only show nodes compatible with that output. To disconnect a noodle, hold Ctrl and click-and-drag from the input slot.
-
Queuing and Managing: The most important shortcut is Ctrl+Enter, which queues the current prompt. You can also use the menu to see the queue size and manage currently running generations.
Building Your First Basic Workflow: Text-to-Image
Now, for the main event. We are going to build a simple, functional text-to-image comfyui workflow from a completely blank canvas. Go ahead and click the “Clear” button on the menu to start fresh. This process will show you how easy use comfyui can be once you understand the five core components.
The 5 Essential Nodes for Every Image
These five node types are the absolute foundation of almost every image generation process.
-
Load Checkpoint: This node is your starting point. It’s used to load the main Stable Diffusion model (.safetensors file) that defines the overall style and content.
-
CLIP Text Encode (Prompt): This node takes your text prompt (the positive prompt) and converts it into a format (CLIP conditioning) that the model can understand. This is where you describe what you want to see.
-
CLIP Text Encode (Prompt): You need a second one of these for your negative prompt. This is where you describe what you don’t want to see (e.g., “ugly, deformed, bad anatomy”).
-
KSampler: This is the engine of the whole operation. It takes the model, your positive and negative prompts, and a starting latent image (noise), and then performs the diffusion process (sampling) to generate the final image in a latent space.
-
VAE Decode & Save Image: The KSampler produces a “latent” image, which isn’t viewable. The VAE (Variational Autoencoder) decodes this latent image into a regular pixel-based image that you can see. The Save Image node then saves this final picture to your output folder.
Connecting the Dots: A Visual Walkthrough
Let’s add and connect these nodes step-by-step.
-
Double-click on the canvas, type “Load Checkpoint,” and press Enter. Click the dropdown inside the node and select the SDXL base model you downloaded earlier.
-
Double-click again, and add a “CLIP Text Encode (Prompt)” node. In its text box, type a simple prompt like: a beautiful landscape painting of a mountain by the sea, masterpiece.
-
Add another “CLIP Text Encode (Prompt)” node. In its text box, type a negative prompt: blurry, ugly, text, watermark.
-
Now, add a “KSampler” node. This one has many inputs.
-
Finally, add a “VAE Decode” and a “Save Image” node.
Now, let’s wire them up. Click and drag from the output circle of one node to the input of another.
-
Connect the MODEL output from Load Checkpoint to the model input on the KSampler.
-
Connect the CONDITIONING output from your positive prompt node to the positive input on the KSampler.
-
Connect the CONDITIONING output from your negative prompt node to the negative input on the KSampler.
-
The KSampler needs a starting point. Double-click and add an “Empty Latent Image” node. Connect its LATENT output to the latent_image input on the KSampler.
-
Connect the VAE output from Load Checkpoint to the vae input on the VAE Decode node.
-
Connect the LATENT output from the KSampler to the latent input on the VAE Decode.
-
Finally, connect the IMAGE output from VAE Decode to the images input on the Save Image node.
Your first complete comfyui workflow is now visually laid out on the canvas!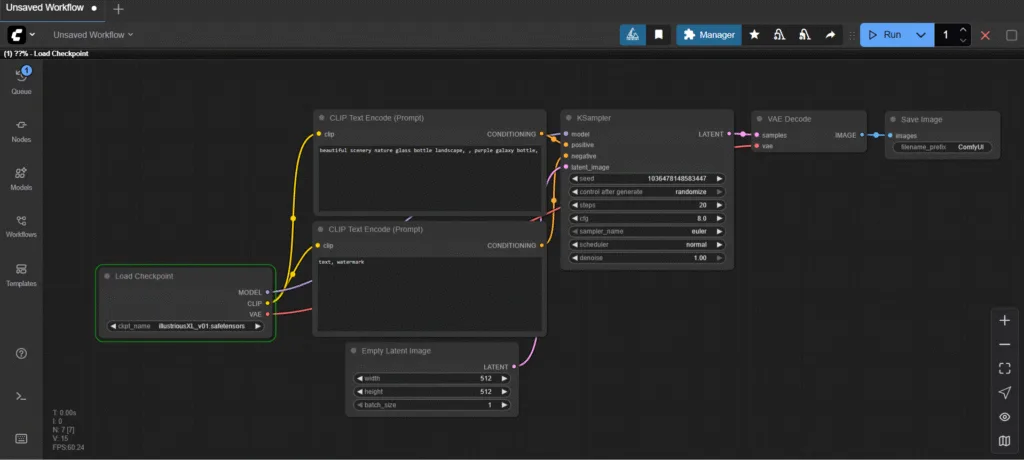
Running Your First Prompt and What to Expect
With everything connected, click the “Queue Prompt” button in the menu (or press Ctrl+Enter). You will see a green highlight appear around the Load Checkpoint node. This highlight will move along the chain of your workflow from left to right as each step is executed. This visual feedback is one of ComfyUI’s best features.
Once the process reaches the Save Image node, it will turn green, and your final generated image will appear right there in the node. It has also been saved to your ComfyUI/output folder. Congratulations, you’ve just gone from zero to generating your first AI image with ComfyUI!
Problem Solving: Why Are My “Nodes Are Empty ComfyUI”?
One of the most common frustrations for beginners is adding a node like “Load Checkpoint” or “Load LoRA” only to find that the dropdown menu inside is completely empty. This is an incredibly common problem, but the fix is almost always simple.
-
The Most Common Reason: Missing or Misplaced Models. 99% of the time, the “nodes are empty comfyui” issue is because the required model files are not in the correct folder. ComfyUI scans specific folders when it starts. If it doesn’t find a model in the right place, the list will be empty.
-
Checkpoints (.safetensors) must be in ComfyUI/models/checkpoints/.
-
LoRAs must be in ComfyUI/models/loras/.
-
VAEs must be in ComfyUI/models/vae/.
-
ControlNet Models must be in ComfyUI/models/controlnet/.
-
-
A Checklist for Troubleshooting Empty Node Selections:
-
Did you place the model file in the exact folder listed above?
-
Is the file extension correct (e.g., .safetensors, .pt, .ckpt)?
-
Did you add the model after you started ComfyUI? This is a key point. ComfyUI only scans folders on startup.
-
The Magic Button: If you’ve added models while ComfyUI is running, simply hit the “Refresh” button on the main menu. This will force a rescan of all model directories and your new models should appear in the list.
-
-
Using the Console for Clues: If refreshing doesn’t work, glance at the console/terminal window that’s running ComfyUI in the background. It will often print error messages if it finds a file in the wrong place or if a file is corrupted and cannot be loaded.
Conclusion: You’ve Mastered the Basics, What’s Next?
You’ve taken a significant step today. You’ve moved beyond the black box of simple interfaces and have taken your first look at the powerful, transparent engine of AI image generation. You’ve learned the core philosophy of ComfyUI, successfully installed it, and navigated its unique interface. Most importantly, you built a functional comfyui workflow from scratch, connected the essential nodes, and created an original piece of AI art. You now possess the foundational knowledge that underpins every single process in ComfyUI, from simple images to complex video animations.
This foundation is your launchpad. Don’t be afraid to experiment. Tweak the settings in the KSampler. Try different checkpoint models. See what happens when you wire things up in new ways. The real learning begins when you start asking “what if?”
And this is just the beginning. The next step in your journey is to discover the incredible world of custom nodes and the essential ComfyUI Manager, a tool that will supercharge your workflow and open up a universe of new creative possibilities. You’re no longer just a user; you’re becoming a builder.