
Let’s be honest. Your laptop can only take you so far. Whether you’re a developer testing a new application, a data scientist training a model, or an entrepreneur launching a website, you eventually hit a wall. You need more power, more reliability, and more flexibility than the machine on your desk can offer. You need a server. But the thought of buying, building, and maintaining a physical server in your office or home is a daunting, expensive, and often impractical nightmare. This is where the cloud steps in, and at the heart of the cloud is the Google Cloud virtual machine.
If you’ve ever felt that the world of cloud computing is an intimidating landscape of acronyms and complex diagrams, this guide is for you. We’re going to demystify it all, piece by piece. Think of this as your friendly, hands-on manual. We’ll start with the basics, explaining what a virtual machine even is, and walk you all the way through creating your very first server in the cloud, understanding how much it will cost, and learning how to manage it. By the end of this article, you will not just understand what a Google Cloud VM is; you will have the confidence and the skills to deploy one for your own projects.
- What is Google Compute Engine? The Workshop, Not Just the Tool
- Why Choose a Google Cloud VM over a Physical Server?
- Understanding the Building Blocks: Core VM Components
- Step-by-Step Tutorial: How to Create a Windows VM in Google Cloud
- Connecting to Your Windows VM via RDP: Your Virtual Desktop
- Demystifying Costs: Compute Engine Pricing Explained
- For the Power Users: The Google Cloud CLI
- Google Cloud VM vs. AWS EC2: A Quick Comparison
- Conclusion: Your Journey with Cloud Computing Has Begun
What is Google Compute Engine? The Workshop, Not Just the Tool
Before we can talk about a virtual machine, we need to talk about where it lives. You’ll hear the term “Google Compute Engine” (or GCE) used constantly, and it’s a simple but crucial concept to grasp.
Google Compute Engine is the actual service within Google Cloud Platform (GCP) that lets you create and run virtual machines.
Think of it like this: if a virtual machine is a powerful custom-built computer, then Google Compute Engine is the massive, state-of-the-art workshop where you can build and operate it. GCE provides all the tools, the infrastructure, the power, and the security. You just decide what kind of computer you want to build. It’s the foundational layer of Google’s Infrastructure-as-a-Service (IaaS) offering, giving you raw access to computing resources without you ever having to worry about the physical hardware, networking cables, or power bills for a data center.
Okay, So What Is a Google Cloud Instance?
You’ll quickly notice that Google often uses the term “instance” instead of “virtual machine.” Don’t let this confuse you.
An “instance” is simply Google’s official name for a single virtual machine running on Compute Engine.
For all practical purposes in our discussion, VM and instance mean the exact same thing. When you create a Google Cloud instance, you are creating a Google Cloud VM. It’s a powerful, private, virtual computer whose resources (like CPU and RAM) are dedicated entirely to you. It looks and feels just like a physical server, but its hardware is managed by Google in one of its highly secure, global data centers. You just get to use it. When you click “create,” you are spinning up a new instance of a virtual machine on Google’s infrastructure.
Why Choose a Google Cloud VM over a Physical Server?
Why go through all this instead of just buying a powerful PC and sticking it in a closet? The benefits of using a cloud VM are transformative for projects of any size, from a personal blog to a global enterprise application.
-
Incredible Scalability: This is perhaps the most significant advantage. Imagine your website is featured on a major news outlet. With a physical server, the sudden traffic spike would likely cause it to crash. With a GCP VM, you can upgrade its CPU and RAM in minutes to handle the load. This on-demand elasticity, both scaling up and scaling down, is impossible with a fixed piece of hardware.
-
Pay-as-you-go Economics: A powerful physical server is a huge upfront capital expenditure (CapEx). You have to pay thousands of dollars before you even know if your project will be successful. With a virtual machine, you only pay for the resources you use, for the seconds you use them. This shifts your spending to a predictable, manageable operational expense (OpEx), dramatically lowering the barrier to entry for new ideas.
-
Global Reach, Local Speed: Google has data centers all over the world. You can launch your VM in a region physically close to your users, whether they are in London, Tokyo, or São Paulo. This drastically reduces latency (the delay in data transfer) and provides a much faster, more responsive experience for your end-users.
-
Bulletproof Reliability and Security: Your home or office can lose power or internet. A hard drive can fail. A physical server is vulnerable. Google’s data centers are engineering marvels with redundant power, cooling, and networking. They have teams of engineers managing the hardware 24/7. The uptime, reliability, and physical security are things you could never affordably replicate on your own.
-
Focus on Your Code, Not Your Hardware: Every hour spent worrying about a failing power supply or a broken fan on a physical server is an hour you’re not spending improving your application or growing your business. Using a cloud VM abstracts away all the hardware headaches, allowing you to focus on what truly matters: your software.
Understanding the Building Blocks: Core VM Components
Before we jump into the tutorial, let’s quickly break down the “parts list” for your virtual computer. When you configure a VM in the Google Cloud Console, you’re essentially choosing from a catalog of virtual components.
Machine Types: The Brains and Brawn
Google offers a huge variety of machine types, which are pre-configured combinations of virtual CPUs (vCPUs) and memory (RAM). They are grouped into “series” designed for different jobs:
-
E2 (General-Purpose): The workhorse series. E2 instances are the most cost-effective and are perfect for web servers, small-to-medium databases, and general development tasks. The famous google cloud free tier vm is an e2-micro instance, which belongs to this family.
-
N2/N2D (General-Purpose): A step up in performance from E2, offering a better price-to-performance ratio for more demanding applications that need more power without breaking the bank.
-
C3 (Compute-Optimized): These are the sprinters. With a high ratio of CPU to memory, they are built for CPU-intensive workloads like high-performance computing (HPC), gaming servers, and media transcoding, where raw processing power is the most critical factor.
-
M3 (Memory-Optimized): The marathon runners. These instances offer massive amounts of RAM (up to 12 TB on some types) and are designed for large in-memory databases (like SAP HANA), real-time data analytics, and other memory-hungry enterprise workloads.
Persistent Disks: The Virtual Hard Drive
A “persistent disk” is what it sounds like: a durable storage device for your instance. Think of it as your VM’s virtual C: drive. It’s where the operating system, your applications, and your files are stored. A key feature is that the disk is independent of the VM—you can detach it from one instance and attach it to another, much like a USB hard drive.
You have a few choices for your storage:
-
Standard Disks (HDD): The most economical choice, using traditional spinning hard drives. Best for bulk storage, backups, or workloads with infrequent read/write operations.
-
Balanced Disks (SSD): A great middle ground, offering a balance of cost and the speed of a Solid-State Drive. This is the default for most new VMs and is a great choice for most general-purpose workloads.
-
Performance Disks (SSD): The fastest option, ideal for high-performance databases and applications that need the lowest possible latency for I/O operations.
This is also where planning your google cloud vm backup strategy begins. You can take “snapshots” of your persistent disks, which are point-in-time backups that can be used to restore your data or create new, identical disks for cloning your server.
Operating Systems (Boot Disk)
This is the software foundation of your server. Your “boot disk” is a persistent disk that contains the operating system. While Google offers a vast library of Linux distributions, it also has full support for Windows. For this guide, we will be focusing on Windows Server, as it allows us to demonstrate how to connect via a graphical user interface. The available images include:
-
Windows Server 2022, 2019, 2016 (Datacenter Edition): The standard for running Windows-based applications, hosting websites on IIS, or running Microsoft SQL Server.
-
Linux (Debian, Ubuntu, etc.): While not the focus of our tutorial, these are extremely popular choices, especially for web servers and open-source software.
Networking: Your VM’s Connection to the World
Every VM you create lives inside a Virtual Private Cloud (VPC), which is your own private, isolated network within Google Cloud. This is where you define firewall rules and manage how your instances talk to each other and the internet.
Crucially, every VM gets an IP address. By default, this is an “ephemeral” IP, meaning it can change if you stop and restart the instance. For any real server, this is not ideal. Therefore, you’ll almost always want to know how to assign static ip to google cloud vm. A static IP address is reserved for your project and remains attached to your instance permanently, which is essential for things like pointing a domain name (www.yourwebsite.com) to your server or allowing other services to connect to it reliably.
Step-by-Step Tutorial: How to Create a Windows VM in Google Cloud
Enough theory. Let’s build something. We will now walk through the most common informational query: how to create a vm in google cloud, but with a specific focus on creating a Windows Server that you can connect to with a familiar desktop interface.
-
Navigate to the Compute Engine Dashboard.
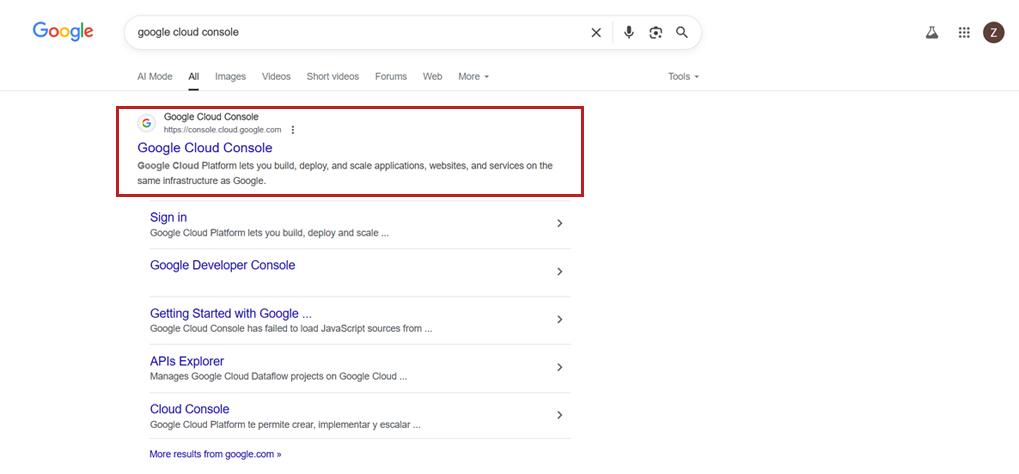
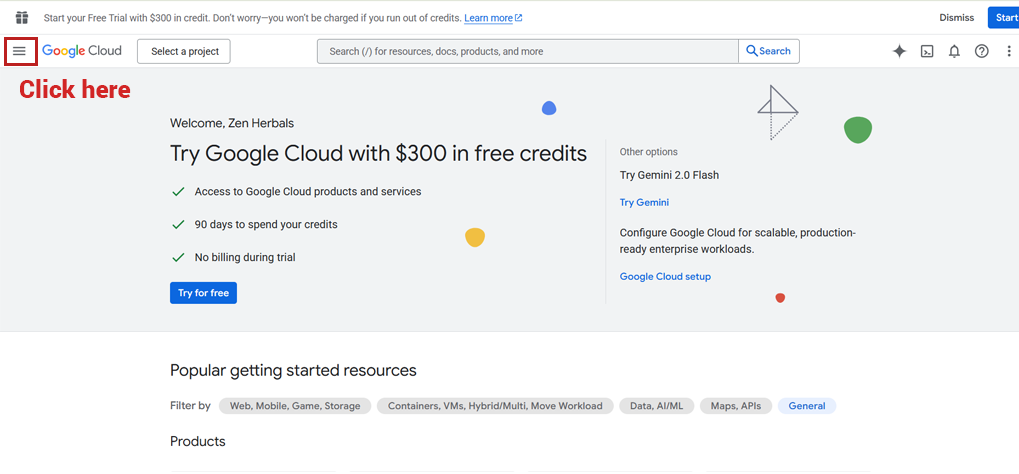
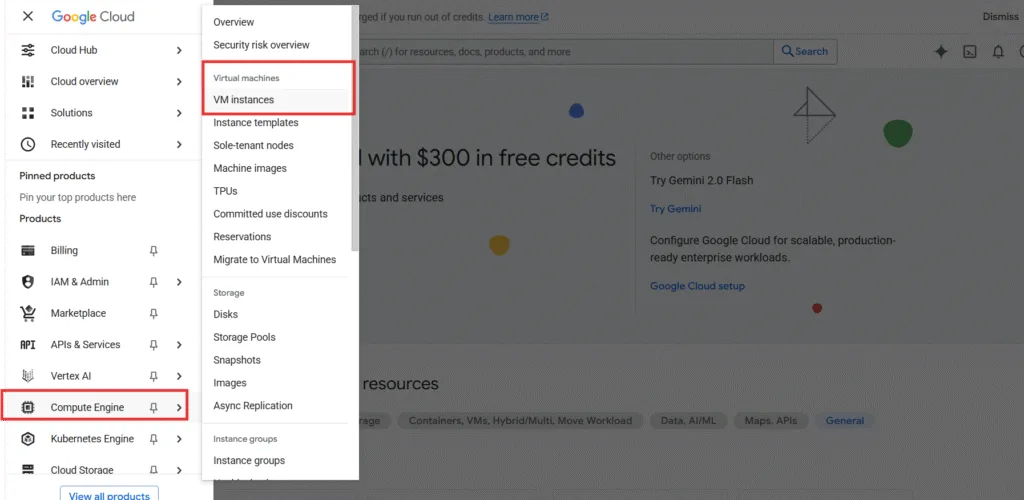
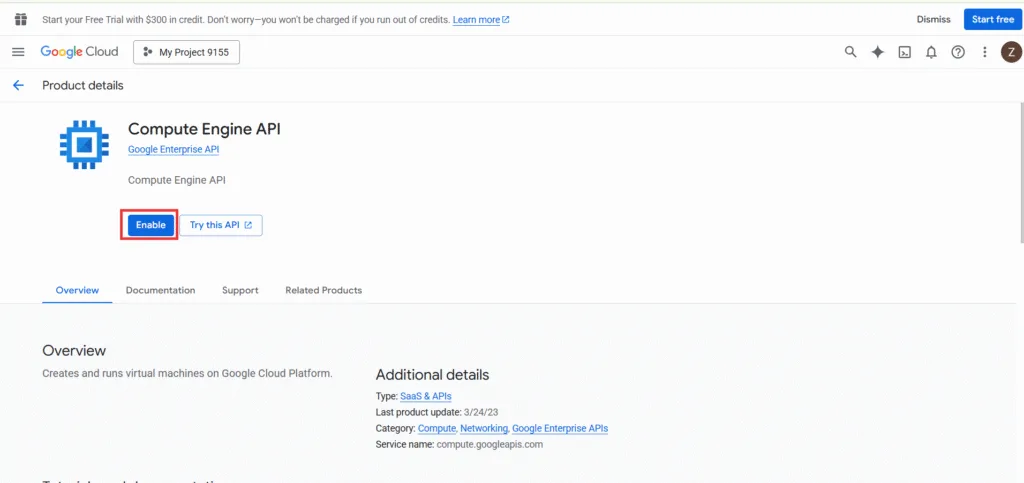
Log into your Google Cloud Console. In the navigation menu (the “hamburger” icon ☰ on the top left), scroll down to Compute Engine and click on it. If it’s your first time, you may need to enable the Compute Engine API.
-
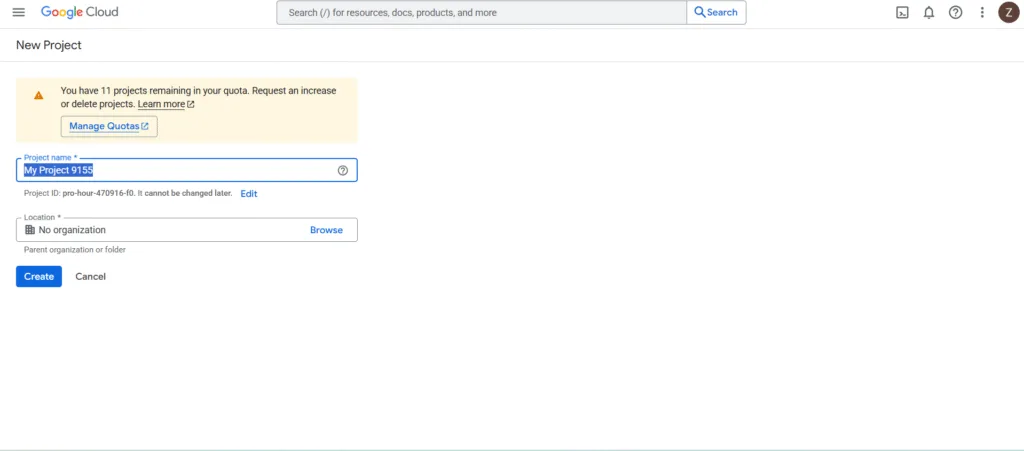
The initial step is to establish a project. To do so, click the ‘Create Project’ button on the right, enter the project details, and confirm by clicking ‘Create’.
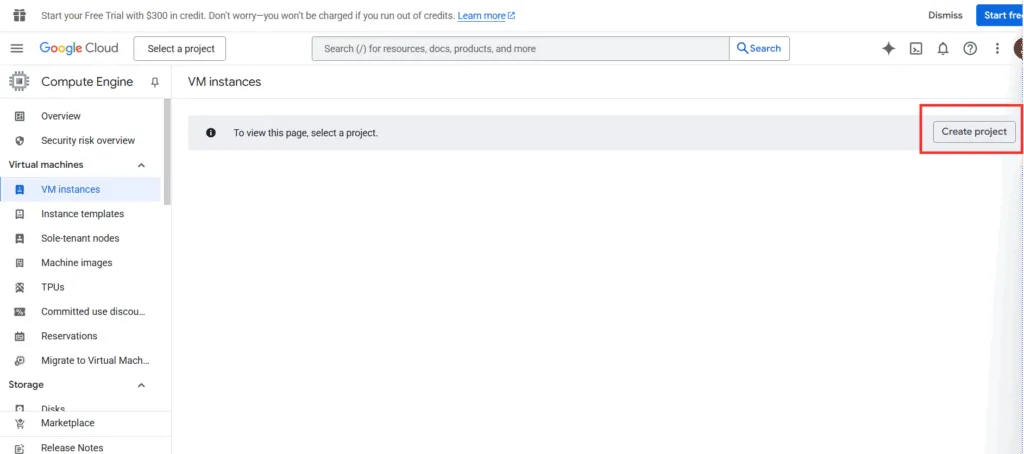
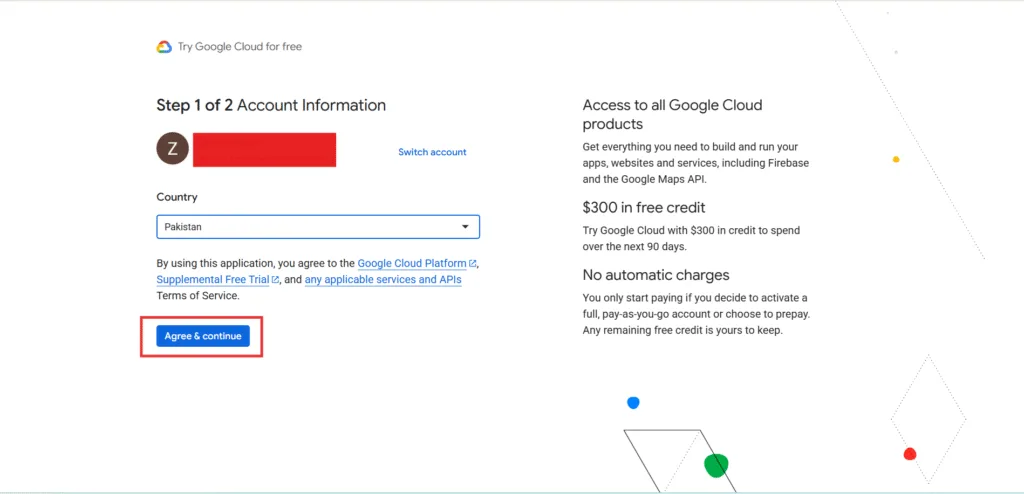
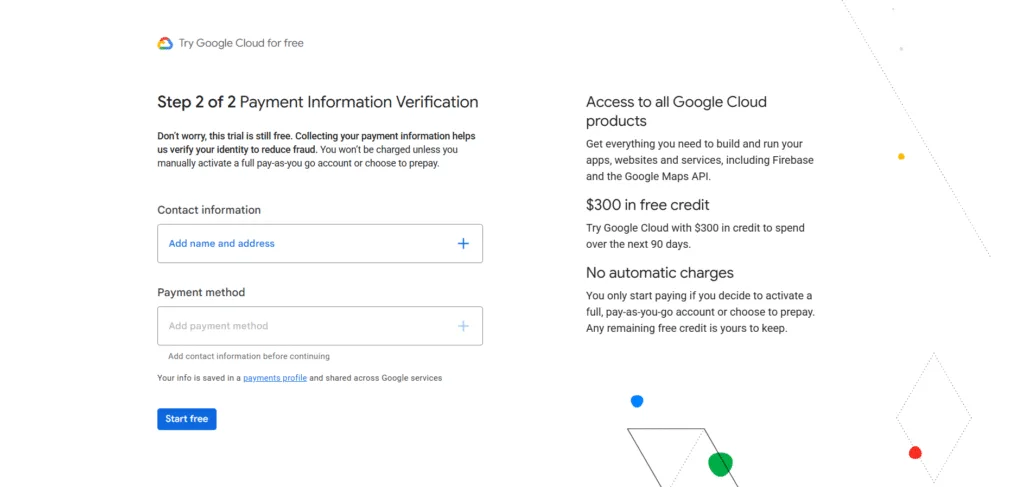
 To enable the Compute Engine API for creating a virtual machine, you must attach the billing account. The benefit of adding a bank account is that you will receive $300 in free credits to use within 3 months.
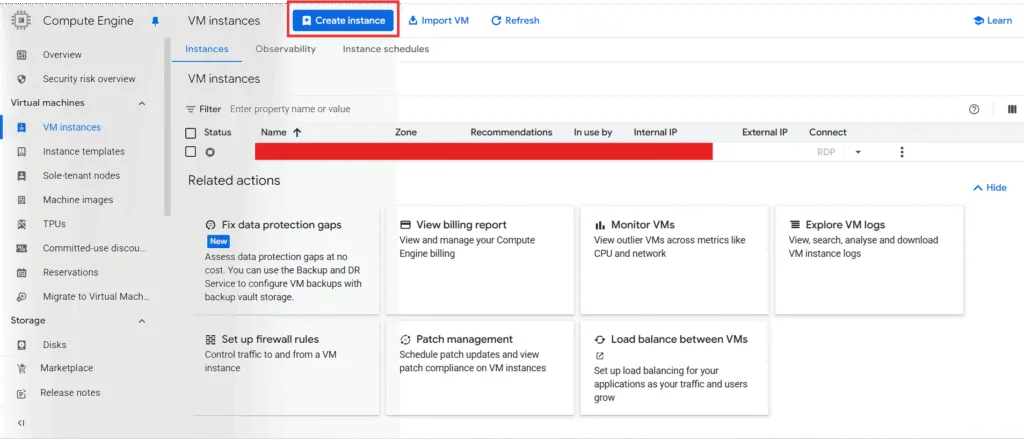
- Start the Creation Process.
In the Compute Engine dashboard, click on “VM instances” in the left-hand menu. Then, click the prominent “CREATE INSTANCE” button at the top of the page.
-
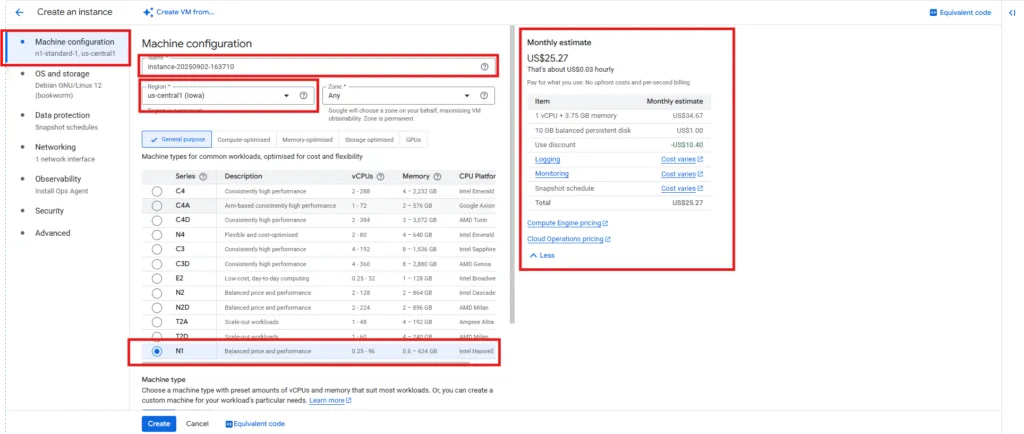
Configure Your Instance.
You’ll now see the main configuration page. It can look overwhelming, but we’ll break down the most important settings for our Windows server.-
Name: Give your instance a memorable, lowercase name (e.g., my-first-windows-server).
-
Region and Zone: The region is the geographic location (e.g., us-central1 – Iowa). The zone is an isolated location within that region (e.g., us-central1-a). For a simple project, choosing a region close to you is a good start.
-
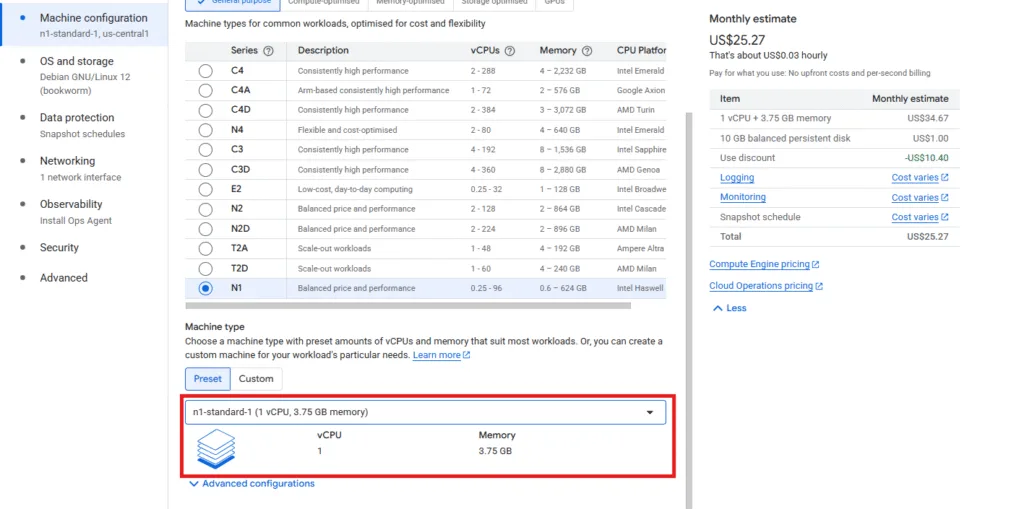
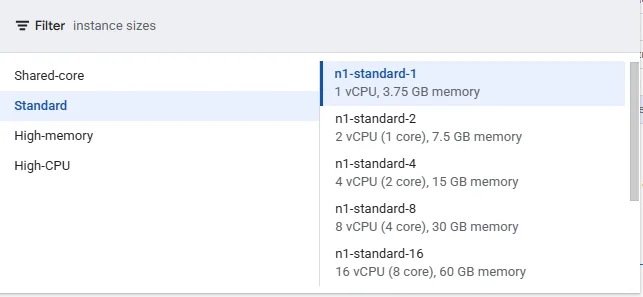
Machine Configuration (Series and Machine Type): This is where you choose your CPU and RAM. For a first Windows project, the E2 series is perfect. The e2-medium (2 vCPU, 4 GB RAM) is a solid and cost-effective starting point for Windows Server.
-
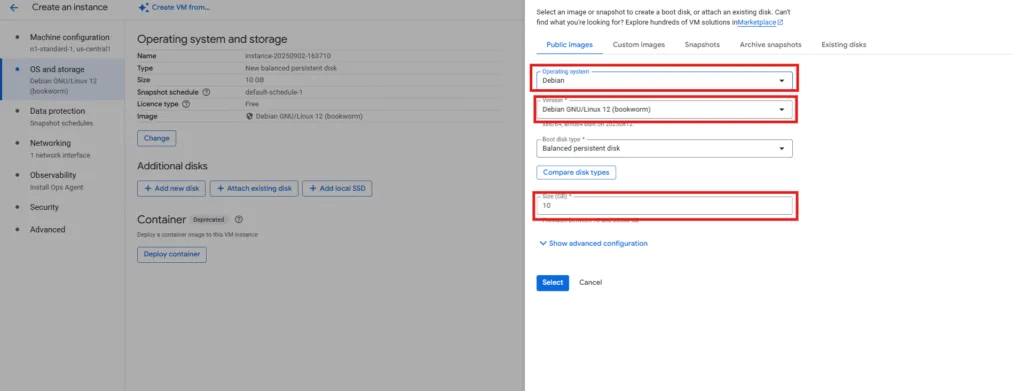
Boot Disk: This is the most important step for our tutorial. Click the “Change” button.
-
For the Operating System, select Windows Server.
-
For the Version, choose a recent version like Windows Server 2022 Datacenter.
-
The default Balanced persistent disk is fine, but increase the Size to at least 50 GB, as Windows Server requires more space than Linux.
-
Click “Select”.
-
-
Firewall: This controls what traffic can reach your instance. Unlike Linux where you might check HTTP/HTTPS, for Windows Remote Desktop, the necessary port (3389) is typically allowed by a default firewall rule in most projects. You can leave the firewall boxes unchecked for now.
-
-
Create the Instance.
Scroll to the bottom of the page and click the “Create” button. You’ll be taken back to the VM instances list. You will see your new instance with a spinning icon next to it. After a minute or two (Windows can take slightly longer to boot than Linux), the icon will turn into a green checkmark.
Congratulations! Your Google Cloud virtual machine running Windows Server is now live and ready for you to access.
Connecting to Your Windows VM via RDP: Your Virtual Desktop
Your Windows VM is running, but you need a way to see and interact with its desktop, just like a regular computer. The standard way to do this is with Remote Desktop Protocol (RDP).
-
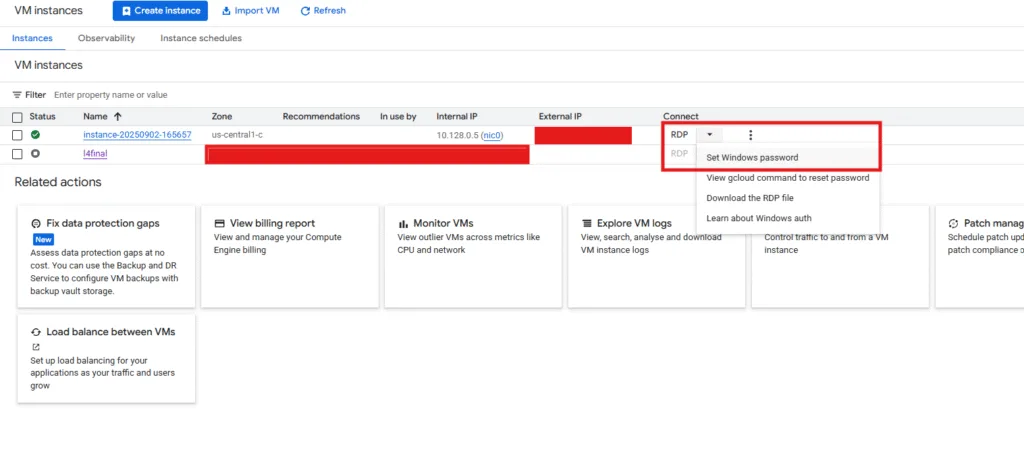
Set a Windows Password.
Unlike Linux which uses SSH keys, you need to create a password for your Windows user. This is a critical first step.-
In the VM instances list, click on the name of your new instance (my-first-windows-server).
-
On the instance details page, you’ll see a button that says “Set Windows password”. Click it.
-
A dialog box will pop up. You can optionally change the username (the default is fine). Click “SET”.
-
Google will now generate a strong, random password. A “New Windows password” box will appear. This is the only time you will see this password. It is absolutely crucial that you click the copy icon and paste it into a secure location, like a password manager or a temporary text file.
-
-
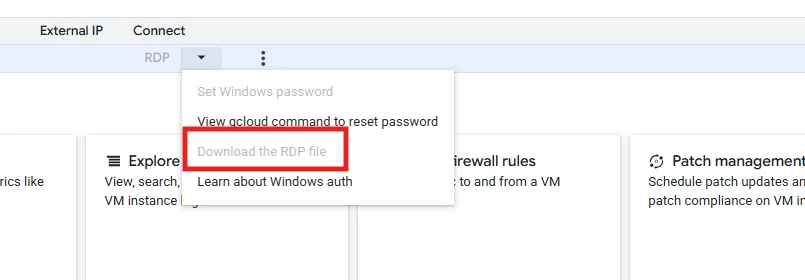
Download the RDP File.
Now that you have your password, go back to the main VM instances list.-
Find the row for your Windows instance.
-
Under the “Connect” column, click the dropdown arrow next to “SSH” and select “Download the RDP file”.
-
Save this file to your computer. It’s a small configuration file that knows your VM’s IP address.
-
-
Connect!
-
Find the RDP file you just downloaded and double-click it.
-
Your computer’s Remote Desktop client will open. You may see a security warning about an unknown publisher; click “Connect” to proceed.
-
The Windows login screen will appear. It will ask for your credentials.
-
Enter the username you set (or the default one that was shown).
-
Carefully paste the long, complex password you copied in Step 1 into the password field.
-
Click “OK”.
-
After a few moments, you will see the familiar Windows Server desktop and welcome dashboard load. You now have full graphical control over your virtual machine in the cloud. You can install software, browse the web, and manage it just like any other Windows computer.
Demystifying Costs: Compute Engine Pricing Explained
“This is great, but how much is it going to cost me?” This is the most important question, and understanding compute engine pricing is key to using the cloud effectively. Google’s pricing model is granular, but it breaks down into a few main components.
-
vCPU and Memory: This is the core cost. You pay for the machine type you choose (e2-medium in our case), billed per second, with a one-minute minimum.
-
Persistent Disk Storage: You pay for the amount of storage you’ve allocated (the 50 GB boot disk), billed per GB per month.
-
Windows Server License: When you run a Windows VM, there is an additional hourly license fee charged by Microsoft, which Google passes on to you. This is a key cost difference compared to running a free open-source OS like Ubuntu.
-
Network Egress: You generally don’t pay for data coming into your VM (ingress). You do pay for data going out of your VM to the internet (egress), billed per GB. There’s a generous free tier for this, so it’s often not a factor for small projects.
For a precise estimate, always use the official Google Cloud Pricing Calculator, making sure to select Windows Server as your operating system to include the licensing cost.
For the Power Users: The Google Cloud CLI
While using the web console is great for beginners, most experienced professionals prefer to work from the command line. The google cloud cli (or gcloud) is a powerful tool that lets you manage your entire cloud infrastructure from your terminal.
Here is a gcloud compute instances create example for a Windows Server:
Bash
gcloud compute instances create my-cli-windows-server \
    --project=your-gcp-project-id \
    --zone=us-central1-a \
    --machine-type=e2-medium \
    --image=windows-server-2022-dc-v20240411 \
    --image-project=windows-cloud \
    --boot-disk-size=50GB \
    --boot-disk-type=pd-balanced
Learning the CLI is a gateway to automating your infrastructure. Just as you’d use the CLI to manage VMs, you can also use APIs to interact with powerful AI services. For instance, if you’re exploring AI development on your new VM, you’ll need to know how to get an API key for services like Google’s Gemini. We cover that entire process in our guide, Mastering Google AI Studio: The Ultimate Guide to Learning, API Keys, and Gemini Models.
Google Cloud VM vs. AWS EC2: A Quick Comparison
You can’t talk about cloud computing without mentioning Amazon Web Services (AWS). Their equivalent of Compute Engine is called Elastic Compute Cloud (EC2). The google cloud vm vs aws ec2 debate is ongoing, but here’s a high-level look:
| Feature | Google Cloud VM (Compute Engine) | AWS EC2 (Elastic Compute Cloud) |
| Terminology | Instance, Machine Type | Instance, Instance Type |
| Pricing | Per-second billing, automatic Sustained Use Discounts | Per-second billing, Savings Plans & Reserved Instances (requires commitment) |
| CLI Tool | gcloud | aws cli |
| Global Network | Renowned for its high-quality, private fiber network connecting data centers. | The market leader with the most extensive global infrastructure and regions. |
| Free Tier | One e2-micro Linux instance per month, continuously. (Windows is not free). | One t2.micro instance (Linux or Windows) for 750 hours/month for the first year. |
The consensus is that Google’s pricing can be simpler to understand and its automatic discounts are very user-friendly. AWS has a wider array of specialized instance types and a larger market share. For an in-depth look, consult the official documentation for Google Compute Engine and Amazon EC2.
Conclusion: Your Journey with Cloud Computing Has Begun
We have traveled a long way from that initial, intimidating idea of a “server in the cloud.” You now know that a Google Cloud virtual machine is simply your own private computer, an “instance,” running on Google’s powerful Compute Engine service. You’ve seen the building blocks—machine types, disks, and networking—and you’ve walked through the exact steps to build and connect to your very first Windows Server.
More importantly, you’ve learned the why. You understand the immense power that scalability, reliability, and pay-as-you-go pricing gives you. You have the knowledge to move your ideas off your local machine and onto a global stage. The server you created today is a blank canvas. It can become a web server, a database, a remote desktop for your team—anything you can imagine. The journey into cloud computing is one of continual learning, but you have successfully taken the most important step: you’ve begun.